

Best LED Strip Lights for Outdoor Deck Lighting in Australia | Volka Lighting
Best LED Strip Lights for Outdoor Deck Lighting: The Complete Australian Guide
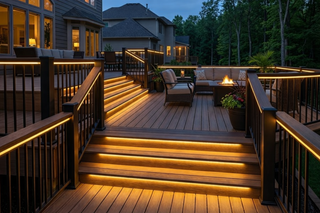
Choosing the right outdoor deck LED strip lighting means understanding weatherproofing, voltage, colour temperature, and proper mounting — before you spend a dollar. Whether you are adding deck step lighting for nighttime safety, running waterproof outdoor LED strip lights under handrails, or outlining the full perimeter of an entertaining area, this guide covers exactly what to specify for Australian conditions so your installation looks professional and lasts for years.
Below you will find IP ratings explained, 12V vs. 24V compared, colour temperature matched to timber type, step-by-step installation instructions, mounting locations, dimming options, and a complete parts list.
Quick Answer: What Are the Best LED Strips for Outdoor Decks?
The best LED strip lights for an outdoor deck are 24V strips with a CRI of 90 or above, mounted inside an aluminium channel or silicone tube. Choose an IP rating based on how exposed the installation is — IP65 is perfectly suitable for sheltered areas, while IP67 is the right choice for fully exposed locations. Match colour temperature to your timber: warm white (2700K–3000K) for dark hardwoods, natural white (3500K–4000K) for lighter timbers and composites.
- IP rating: IP65 for sheltered or covered areas; IP67 for fully exposed locations. See the full IP rating explanation below.
- Voltage: 24V strips for any run over 3 metres — essential for consistent brightness on perimeter and handrail runs.
- CRI: 90 or above to render timber grain and colour accurately under artificial light.
- Colour temperature: Warm white (2700K–3000K) for darker hardwoods; natural white (3500K–4000K) for lighter timbers, pine, and composite boards.
- Mounting: Always use an aluminium LED profile or silicone tube — never stick bare strips directly to timber.
What Do IP65 and IP67 Mean for LED Strip Lights?
IP stands for Ingress Protection. The first digit (6) means the strip is completely sealed against dust. The second digit indicates water resistance: 5 means protection against low-pressure water jets from any direction, while 7 means the strip can withstand temporary submersion up to one metre.
IP67 is the right choice for any LED strip or channel that is fully exposed to the elements — areas subject to heavy rain, direct hose spray, or pressure cleaning. IP65 is perfectly suitable for outdoor deck lighting in sheltered or semi-sheltered positions, such as under handrails, beneath shade structures, inside covered pergolas, or along deck edges that are not directly exposed to heavy water contact. When mounted inside a standard aluminium profile or silicone tube, IP65 dotless and neon LED strips are a very common and practical option for many deck installations. Not every outdoor deck location requires IP67 — the right rating depends on how exposed the specific mounting position is.
The Non-Negotiable Specs: What to Get Right Before You Buy
The right first question is not "which strip looks good?" — it is "will it survive?" Australian decks face rain, humidity, direct sun, insects, and temperature swings from near-zero winter nights to 40-degree summer days. Get the specifications wrong and you will be replacing everything within two years.
Weatherproofing: Three Mounting Options
There are three proven ways to waterproof an LED strip installation on a deck. Each works well — the right choice depends on your layout, level of exposure, and finish preference.
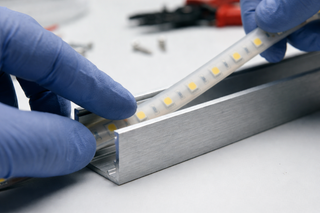
Option 1: Standard aluminium channel with a waterproof strip inside. This is the most common approach for outdoor deck lighting. Use a standard aluminium LED channel and run a pre-waterproofed IP67 LED strip inside it. The strip carries the waterproofing; the channel provides heatsinking and a clean finish. This gives you the widest selection of profile shapes and styles while remaining fully weather-rated.
Option 2: IP67 waterproof aluminium channel. Mount your strip inside an IP67 rated waterproof channel. Because the channel itself is fully sealed against moisture, you only need a standard IP20 strip inside — the channel does the waterproofing for you. It also acts as a heatsink and produces a clean light line. This is the best approach for fully exposed areas.
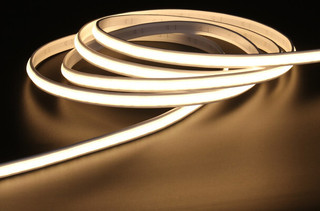
Option 3: Silicone tubing. Slide any LED strip inside an LED neon silicone tube. The silicone encases the strip and waterproofs it completely. Multiple tube sizes are available to suit different strip widths. This option is ideal when you want a specific density, COB dotless finish, or colour output, and it produces a smooth neon-style glow that looks excellent along handrails and edges. For sheltered deck areas, an IP65 strip inside a silicone tube or standard aluminium profile is a very common and practical setup.
For a ready-made neon look, the Water-Resistant Dotless Neon Slim Strip Light comes pre-assembled with a smooth continuous glow and no visible dots.
Power Supply: 12V vs. 24V and Choosing the Right Driver

Voltage drop is the enemy of long LED strip runs. As current travels along the strip, resistance causes voltage to sag — dimming the far end and shifting colour toward yellow. A 24V system handles this far better than 12V over distance.
| Feature | 12V LED Strips | 24V LED Strips |
|---|---|---|
| Best run length | Up to 3 metres | 5+ metres (feed both ends for very long runs) |
| Voltage drop impact | Noticeable dimming and yellow shift over distance | Minimal — brightness stays consistent |
| Best use on a deck | Short stair runs, single features | Perimeter runs, handrails, full deck layouts |
| Recommended for most decks? | Only for short, isolated runs | Yes — the standard choice |
Use 24V strips for any continuous run over 5 metres. Use a power supply calculator before purchasing to determine the correct driver wattage and type — both IP20 indoor-rated and IP67 outdoor-rated options are available.
If you have a weatherproof enclosure in a sheltered spot, a standard indoor IP20 driver works fine. For exposed mounting, choose an IP67 rated outdoor driver. Either way, the driver must be protected from moisture.
All outdoor cable must be outdoor-rated. Standard indoor wire degrades under UV and moisture. Use outdoor-rated 20AWG 2-pin power wire for every run between the driver and the strips.
Colour Temperature and CRI: Let the Timber Decide
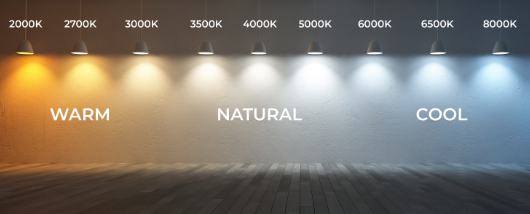
Warm white (2700K–3000K) suits darker Australian hardwoods — Merbau, blackbutt, and ironbark — pulling out the red and brown richness in the grain. Natural white (3500K–4000K) works better on lighter timbers like spotted gum, raw pine, or blond composite boards, where warm white can add an unwanted yellow cast. The natural white LED strip range covers the same wattages and densities as the warm white range.
When in doubt, order a short sample of both and test them against your boards at night before committing.
Whichever colour temperature you choose, pair it with a CRI of 90 or above. CRI (Color Rendering Index) measures how accurately a light source shows colours, from 0 to 100. At CRI 90+, timber grain and colour look close to natural daylight. Low CRI strips flatten the grain; high CRI strips make the same boards look significantly richer.
Dimming and Smart Control: Worth Building In From the Start
A deck running at full brightness all night is a missed opportunity. Build dimming in from the start for full brightness during dinner, ambient mode for late-night entertaining, and scheduling so lights are never left on accidentally.
A single colour dimmer wires between the driver and strip for manual control. For app-based scheduling and smart home integration, a WiFi LED controller connects the lighting to your home network. Mount the controller indoors in a sheltered, dry location.
Where to Mount LED Strips on a Deck
Under Stair Treads
Strips mounted on the riser face of each stair tread wash light across the step surface — sharp-looking deck step lighting that makes stairs safe at night without overhead lights. Use purpose-built floor and stair aluminium profiles designed to recess into or surface-mount onto risers with diffusers that spread light evenly.
Along the Handrails
Mounting under the bottom rail cap creates a soft downward wash. Mounting on the inner post face creates a more dramatic side-lit effect. For a continuous dot-free line, the Water-Resistant Dotless Neon Slim Strip Light gives uniform output with no hot spots. Silicone tubing over a dotless COB strip achieves a similar result if you prefer to build it yourself.
Perimeter Borders and Deck Edges
A strip along the fascia board creates a floating effect at night — particularly striking on elevated decks. Perimeter runs easily reach 10–20 metres, making 24V and correct driver sizing essential for consistent brightness.
How to Install LED Strip Lights on an Outdoor Deck
- Plan your layout. Measure each run (stairs, handrails, perimeter) and note the total length in metres. Decide on mounting positions and mark where the driver will be located.
- Calculate your power supply. Multiply the strip's wattage per metre by total run length, then add 20% headroom. Use a power supply calculator to select the right driver.
- Mount your profiles or silicone tubes. Secure your chosen aluminium channels — IP67 waterproof channels for exposed areas, or standard profiles for sheltered positions — to the deck structure using screws. For curves, use a bendable IP67 plastic profile.
- Run outdoor-rated cable. Connect the driver to each strip run using outdoor-rated 20AWG 2-pin power wire. Keep all joins inside the profile or a sealed junction box.
- Insert the LED strip. Press the strip into the channel or slide it into the silicone tube. Use solderless connectors for all strip-to-wire joins.
- Connect the dimmer or controller. Wire a dimmer or WiFi controller between the driver and the strips. Mount it in a dry, sheltered location.
- Test before sealing. Power on the system and check every run for consistent brightness and colour before fitting diffuser covers and end caps.
Safety note: In Australia, any connection to mains power must be carried out by a licensed electrician. The low-voltage LED strip and driver wiring described in this guide can be installed DIY, but the 240V supply connection must be completed by a licensed electrician.
Quick Reference: What to Order for a Standard Deck Build
- Strip: IP67 waterproof LED strip for exposed areas or IP65 strips for sheltered positions, in 24V, warm white or natural white, CRI 90+. Between 7W/m (ambient perimeter) and 15W/m (stair and feature lighting).
- Neon option: Water-Resistant Dotless Neon Slim Strip Light or any strip inside a silicone neon tube.
- Profile: IP67 waterproof channels or standard profile with waterproof strip. Bendable plastic profile for curves.
- Driver: IP67 rated driver for exposed mounting, or indoor driver in a weatherproof enclosure. Size to 80% load max.
- Cable: Outdoor-rated 20AWG 2-pin power wire for all outdoor runs.
- Control: Single colour dimmer or WiFi controller.
- Connectors: Solderless strip connectors for all joins.
Outdoor Deck LED Lighting FAQ
What IP rating do I need for outdoor deck LED strip lights?
It depends on how exposed the mounting position is. IP67 is recommended for fully exposed areas subject to heavy rain or direct water contact. IP65 is perfectly suitable for sheltered positions — under handrails, pergolas, or covered edges. IP65 dotless and neon strips inside an aluminium profile or silicone tube are a very common choice. See the full IP65 vs. IP67 explanation above for more detail.
Should I use 12V or 24V LED strips on a deck?
Use 24V for any run longer than 3 metres. The higher voltage reduces voltage drop, keeping brightness and colour consistent across the full length — which is critical for perimeter and handrail runs.
What colour temperature is best for deck lighting?
Warm white (2700K–3000K) for darker hardwoods like Merbau and ironbark. Natural white (3500K–4000K) for lighter timbers, pine, and composite boards. Always choose CRI 90+ to bring out the natural grain.
Can LED strip lights be used for deck step lighting?
Yes. Mount the strip on the riser face of each stair tread inside a floor or stair aluminium profile. The diffuser spreads light evenly across the step, improving both safety and visual appeal at night.
Do outdoor LED strips need aluminium profiles?
Mounting in a profile or silicone tube is strongly recommended. Profiles act as heatsinks that extend LED lifespan, protect against physical damage, and produce a cleaner light line. The alternative is a silicone neon tube that fully encases and waterproofs the strip.
Need Help? Get a Free Custom Deck Lighting Plan
If your deck layout is complex or you want an expert to check your specifications, the Volka team offers full custom LED lighting solutions. Send your measurements and goals, and receive a free quote with the right products specced for your job — no obligation.
Browse the Custom LED Solutions page for completed residential and commercial projects. When you are ready, fill out the project request form for a proper spec and price. For general questions, reach out through the contact page.
About the Author
This guide was written by the Volka Lighting technical team, with over 15 years of experience designing and supplying LED strip lighting systems and aluminium LED profiles across Australia. The recommendations reflect practical knowledge gained from real residential and commercial lighting installations.
Recent Posts
-

SMD vs COB vs DOB LED Strips | Comparison Guide | Volka Lighting
SMD vs COB vs DOB LED Strips: The Complete Australian Comparison Guide TL;DR: Need a flawless, conti …19th Mar 2026 -

Best LED Strip Lights for Outdoor Deck Lighting in Australia | Volka Lighting
Best LED Strip Lights for Outdoor Deck Lighting: The Complete Australian Guide TL;DR: For outdoor de …10th Mar 2026