

Backlit Marble & Onyx LED Guide | Volka Lighting Australia
How to Backlight Marble & Onyx: The Complete LED Stone Lighting Guide (Australia)
Why Backlight Stone in the First Place
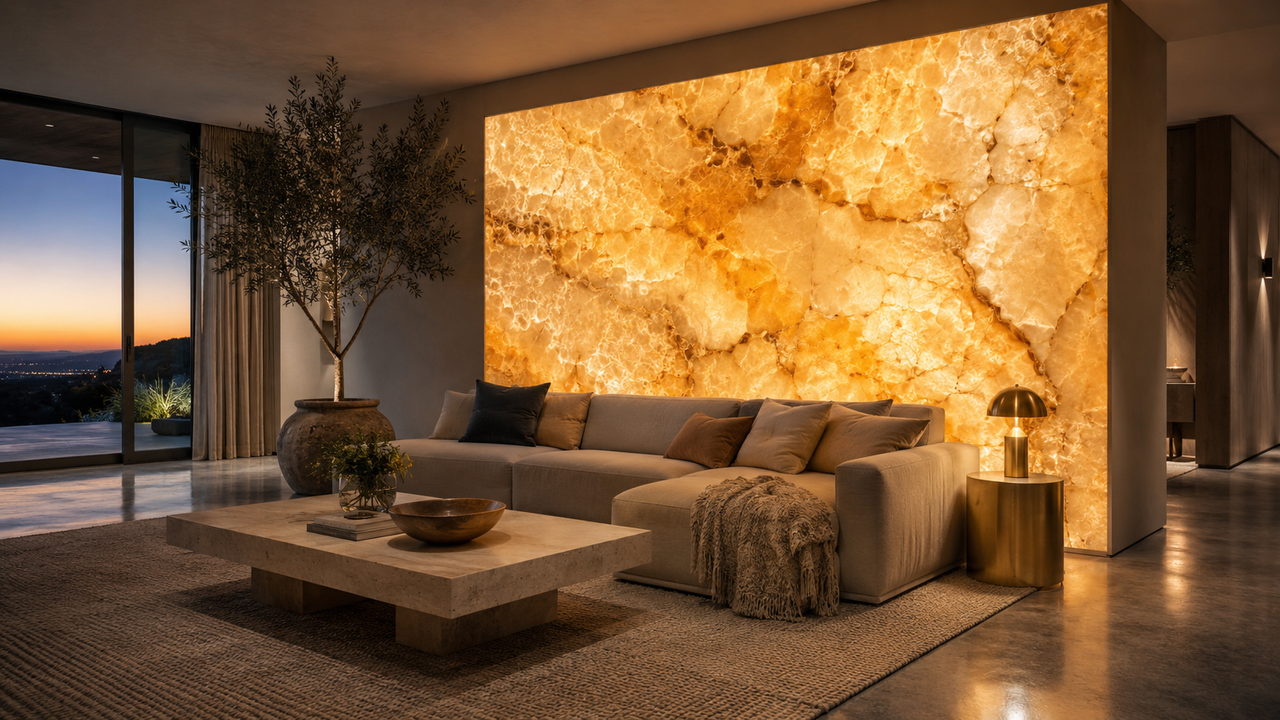
Backlit stone turns an ordinary slab into an architectural light source. The veining, crystals, and natural inclusions in marble or onyx come alive when light passes through the stone instead of bouncing off the front, and the result is a soft, luminous wall that feels closer to stained glass than to a solid surface. It is one of the very few finishes that doubles as both a structural element and a feature light, which is why you see it appearing in high-end Australian projects from Crown Sydney to boutique hotel bars in Fitzroy.
Beyond the visual drama, backlighting solves a practical problem. A dark feature wall in a low-light room (think a powder room, a wine cellar, or a cinema) can disappear at night. Backlighting brings it back into the composition without adding a single ceiling downlight. It is the rare design move that adds atmosphere and ambient light at the same time.
How Backlit Stone Actually Works
Backlighting works because some natural stones are translucent: light entering the back face scatters through the crystalline structure and exits the front face. The thinner the slab and the more open the crystal lattice, the more light gets through. A flat, evenly lit LED panel sits in a shallow cavity behind the stone, and a small air gap (typically 40mm to 60mm) lets the light spread into a uniform field before it hits the back of the slab.
If the LED source is too close, you see individual hotspots through the stone, especially in thinner sections of the veining. If it is too far away, you lose brightness and the effect goes flat. The trick is finding the sweet spot, and that is exactly what dedicated stone-backlight LED sheets are engineered to deliver.
Choosing the Right Stone (Onyx, Marble, Alabaster, Agate)
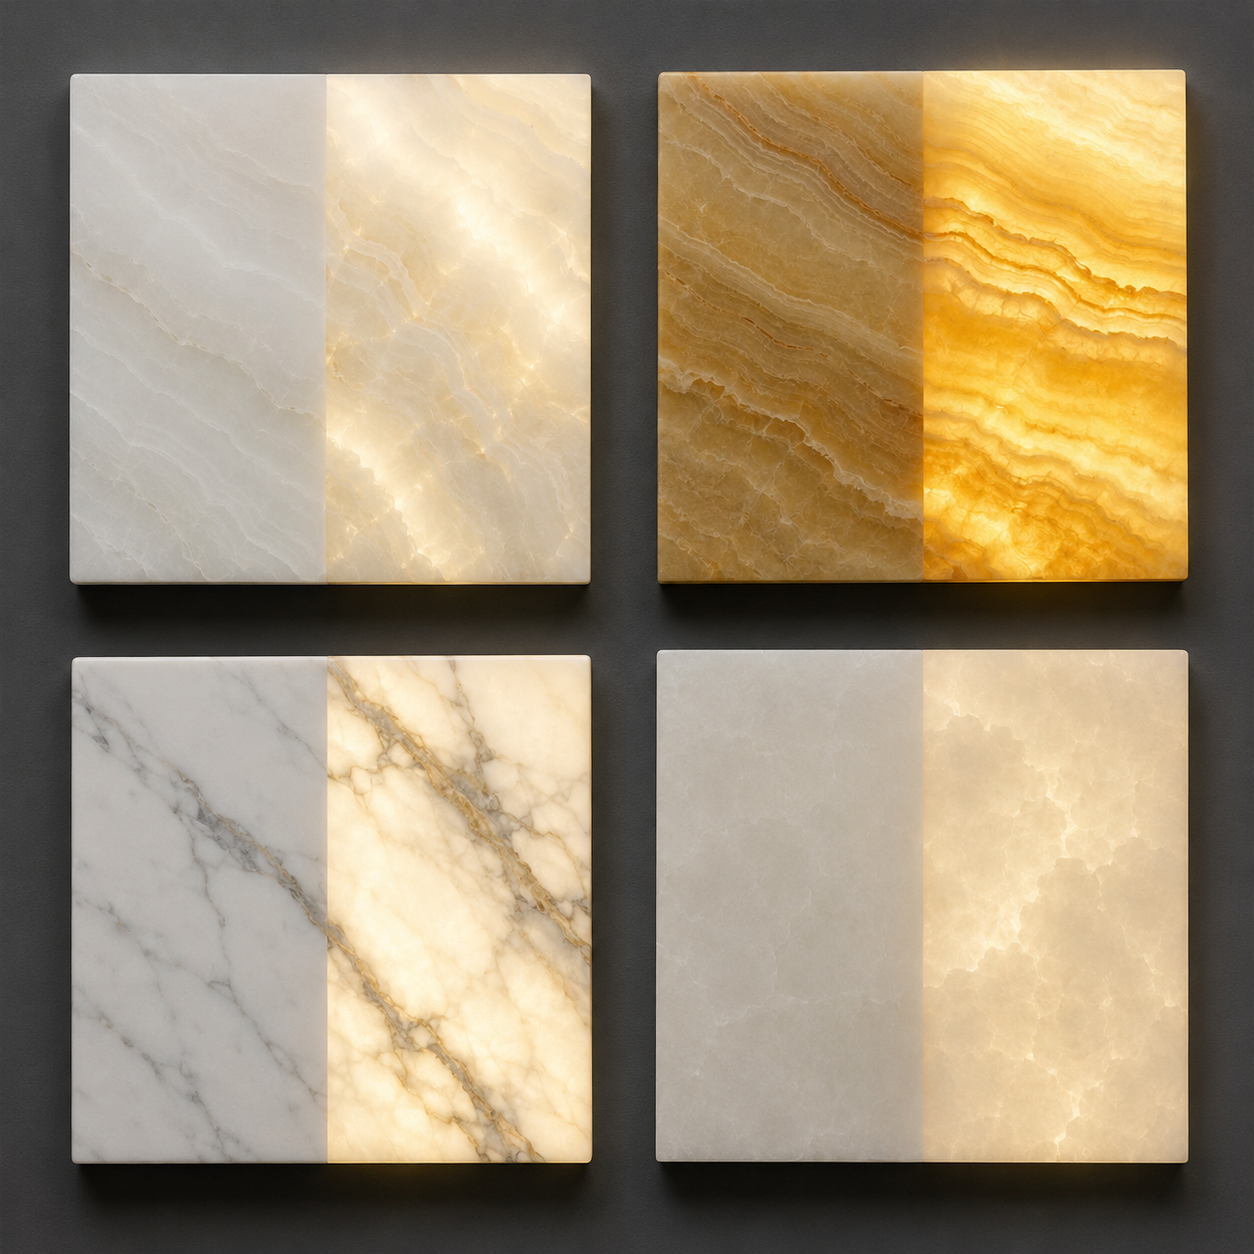
Not every stone backlights well. Translucency depends on the mineral content and the grain structure, so before you order LED panels, confirm with your stonemason that the specific slab you have selected is rated for backlit installation.
Onyx (the gold standard)
Onyx is the most translucent of the commonly available decorative stones and the easiest to backlight. Honey onyx, white onyx, and green onyx all produce a deep, glowing effect with very little electrical input. If you are doing your first backlit project, start with onyx.
Marble
Marble varies enormously. Calacatta, Statuario, and certain Carrara cuts have enough translucency for backlighting in slabs of 18mm or thinner. Heavier, denser marbles (like Nero Marquina or Emperador Dark) absorb almost all light and are not suitable. Always test a sample with a torch from behind before committing.
Alabaster
Alabaster is softer than marble and beautifully translucent, traditionally used for lampshades and altar windows. It backlights superbly but is more fragile and is usually reserved for protected vertical surfaces rather than benchtops.
Agate & semi-precious slabs
Composite agate and semi-precious slabs (rose quartz, amethyst, petrified wood) almost demand backlighting to look their best. The colour saturation and crystal patterns only fully reveal themselves with light passing through the slab.
Slab Thickness & Translucency
Thickness is the single biggest variable in how much light reaches the front face of the stone. Thinner is brighter, but thinner is also more fragile, and structural slabs need to support themselves and resist impact.
| Slab Thickness | Light Transmission | Best For |
|---|---|---|
| 10mm | Very high | Vertical decorative panels, signage, laminated to glass |
| 12mm to 15mm | High | Wall cladding, bar fronts, headboards |
| 18mm to 20mm | Moderate | Vanities, kitchen islands, reception desks |
| 30mm and above | Low (often poor) | Generally not suitable, consider laminating a thinner skin |
For backlit benchtops, the standard trick is to laminate a 10mm translucent skin (e.g. white onyx) onto a clear glass or acrylic backing for structural strength. The light passes through the skin, the glass takes the load.
Why LED Sheets Beat Strips for Backlighting
You can technically light a small backlit panel with LED strip, but for any area larger than a few hundred millimetres square, dedicated LED sheets are the right tool. Here is why.
- Uniformity. A sheet has hundreds of evenly spaced LEDs across its full face. Strip lighting is linear, so you get bright lines and dark gaps on the slab.
- Depth efficiency. A flat sheet only needs around 50mm of cavity. Strips arranged in a serpentine pattern usually need 70mm to 100mm to blur out into a uniform field.
- Cleaner wiring. One JST plug per sheet, sheets daisy-chain together. No solder joints, no end caps, no profile channels.
- Predictable output. Sheets are designed and binned for stone backlighting, so the lumen output and colour are consistent across the whole installation.
Volka Marble Backlight LED Sheet: Specs at a Glance

The Volka Marble Backlight LED Sheet is built specifically for the job described above. It is a 480 x 240mm flexible board running at 24V DC, drawing 18W per sheet, and rated to over 50,000 hours of life.
| Specification | Detail |
|---|---|
| Panel Dimensions | 480 x 240mm (approx. 500 x 250mm with cables) |
| Voltage | DC 24V |
| Power Draw | 18W per sheet |
| Colour Temperature | 3000K Warm White |
| IP Rating | IP20 (indoor, dry locations) |
| Operating Temperature | -20°C to +50°C |
| Lifespan | Over 50,000 hours |
| Mounting | 3M adhesive backing, no fasteners required |
| Connections | JST plug-and-play, sheets chain together |
| Cuttable | Yes, along marked section lines |
| Warranty | 1 year |
| Price | AUD $46.50 per sheet |
Each sheet ships with two JST-to-JST jumper cables and one JST-to-bare-wire power tail, so a small project (one or two sheets) can usually be wired with no extra accessories beyond a 24V driver.
View the Marble Backlight LED Sheet →
Cavity Construction & The 50mm Rule
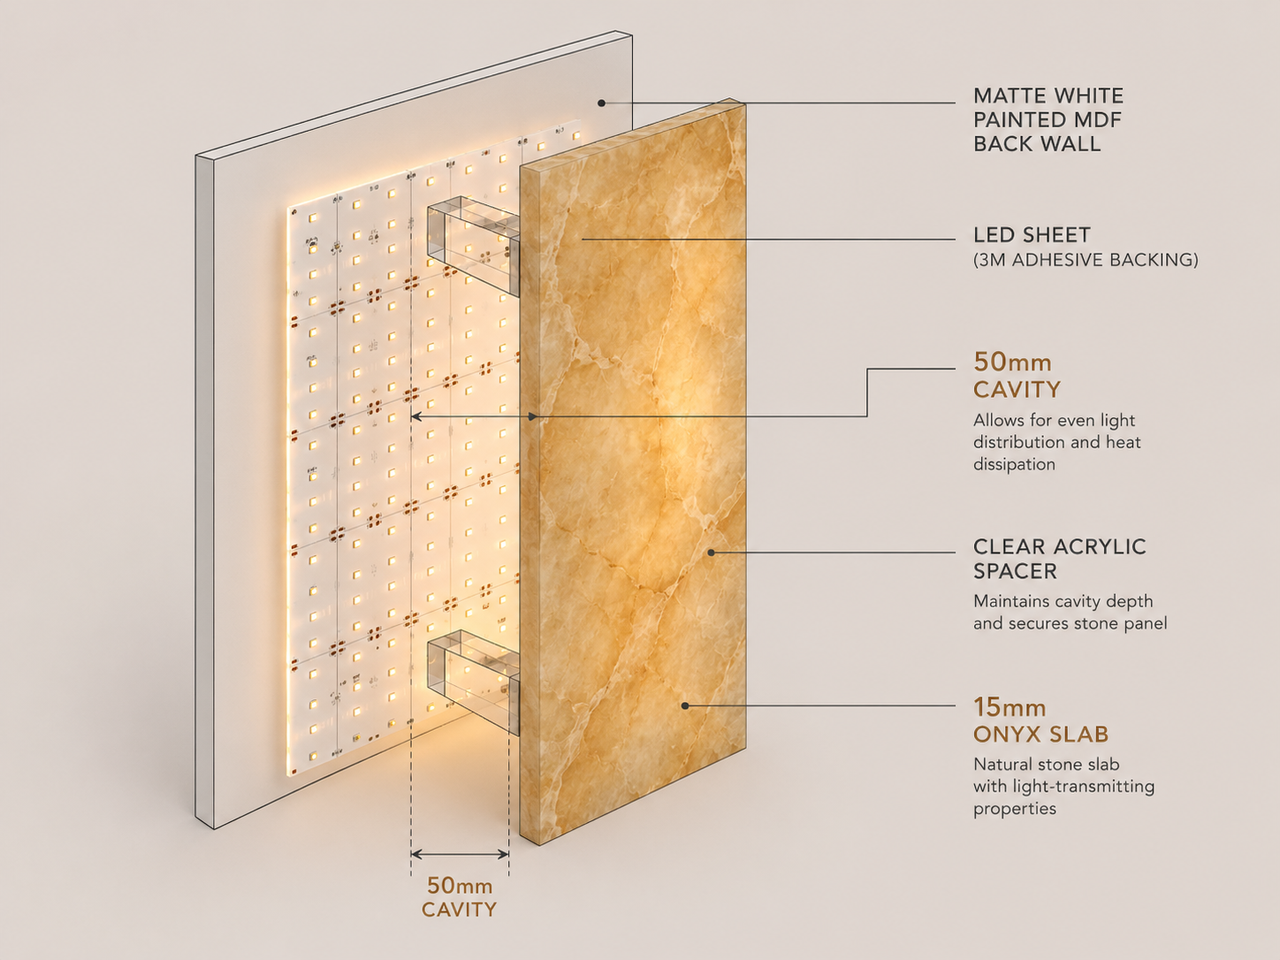
The single most important number in any backlit stone build is the cavity depth: the air gap between the front face of the LED sheet and the back face of the stone. For Volka's 480 x 240mm sheets, target 50mm. Less than 35mm and you risk visible hotspots in the thinner veins. More than 80mm and the brightness drops noticeably.
Build the cavity with a simple timber or aluminium frame around the perimeter of the slab. The LED sheets stick to the back wall of the cavity using the factory 3M adhesive (clean the surface first with isopropyl alcohol). For larger slabs, fit clear acrylic spacers between the back of the stone and the back wall of the cavity to maintain perfectly even depth across the whole panel and to take some of the structural load.
Painting the cavity
Paint the inside of the cavity matte white. White cavity walls bounce light back through the stone instead of absorbing it, and the result is roughly 15 to 25 percent more brightness on the front face for zero extra wattage.
Power, Drivers & Wiring
Each sheet draws 18W at 24V DC, which is 0.75A. Sheets can chain together via the supplied JST jumpers, but you cannot simply chain twenty of them off a single power tail. The thin copper traces will overheat and you will see brightness drop off at the far end of the run.
Plan your power injection like this:
- 1 to 4 sheets: One 24V driver, one feed point. Total load 18W to 72W. A 96W (4A) constant-voltage 24V driver is the safe sizing.
- 5 to 8 sheets: One 24V driver of 200W or more, two feed points (inject power at both ends of the chain).
- 9 sheets and above: Inject power every 4 to 5 sheets (roughly every 72 to 90W of load). Use a single larger driver, or split into two smaller drivers for redundancy.
Always size the driver to roughly 80 percent of its rated capacity to leave thermal headroom. A 96W driver running 72W of load will run cooler and last longer than the same driver at full tilt.
Cutting, Chaining & Custom Sizes
The sheets are designed to cut along marked section lines, which means you can shape them to fit irregular cavities or tile them to cover non-standard slab dimensions. After cutting, the cut section will not light up unless you re-feed power to it, so plan your cuts to retain the JST connection point on the section you want to use.
For a straight rectangular slab (say a 1200 x 600mm bar front), three full uncut sheets laid in a 3-wide, 1-tall arrangement gives near-complete coverage. Where small gaps remain at the edges, the natural light spread across a 50mm cavity will fill them in.
Real-World Applications
Bathroom vanities & splashbacks
A backlit onyx splashback above a vanity is one of the most requested luxury bathroom features in 2026. The warm 3000K glow flatters skin tones in the mirror, and the cavity hides easily behind a stud wall. IP20 rating is fine here as long as the LED sheets sit behind sealed stone with no direct water exposure.
Kitchen islands & bar fronts
Backlit stone islands and bar fronts deliver the strongest "wow" reaction of any feature lighting. Run the panels behind the front face of the island and dim them down for evening entertaining. Pair with under-cabinet strip lighting for a fully resolved kitchen scheme.
Reception desks & commercial counters
For hotels, day spas, and design-led showrooms, a backlit onyx reception counter delivers brand presence the moment a customer walks in. The Volka sheets chain easily across a 3 to 4 metre desk front with a single 200W driver hidden in the joinery.
Headboards & bedroom feature walls
A backlit alabaster headboard is a quiet alternative to a TV-as-art bedroom and reads beautifully on dim. Build the cavity into the wall behind the bed, slot the slab into a recessed reveal, and the result is gallery-grade.
Wine cellars & cigar lounges
Backlit stone shelving back-walls in wine cellars or cigar lounges add ambient light without UV damage to product, since LEDs emit virtually no UV. The 3000K colour temperature works well in these warm, intimate spaces.
Retail & signage
The same panels also work behind acrylic, frosted glass, or printed translucent film for signage and shopfront branding. Anywhere you need flat, even, dot-free light through a translucent surface, the same product applies.
Estimating Cost Per Square Metre
One Volka panel covers 0.115 square metres (480 x 240mm). A single square metre of fully backlit area takes roughly nine sheets, so the LED-only material cost works out to:
| Backlit Area | Sheets Required | Estimated LED Cost | Suggested Driver |
|---|---|---|---|
| 0.5 m² | 5 | $232.50 | 120W 24V |
| 1.0 m² | 9 | $418.50 | 200W 24V |
| 2.0 m² | 18 | $837.00 | 400W 24V (or 2 x 200W) |
| 5.0 m² (large feature wall) | 44 | $2,046.00 | 2 x 480W 24V |
Stone, joinery, and electrical labour are extra. As a rough industry benchmark, a finished, installed backlit onyx feature wall in Sydney or Melbourne in 2026 costs between $1,800 and $3,500 per square metre fully delivered, with the stone being the dominant cost driver.
Step-by-Step Installation
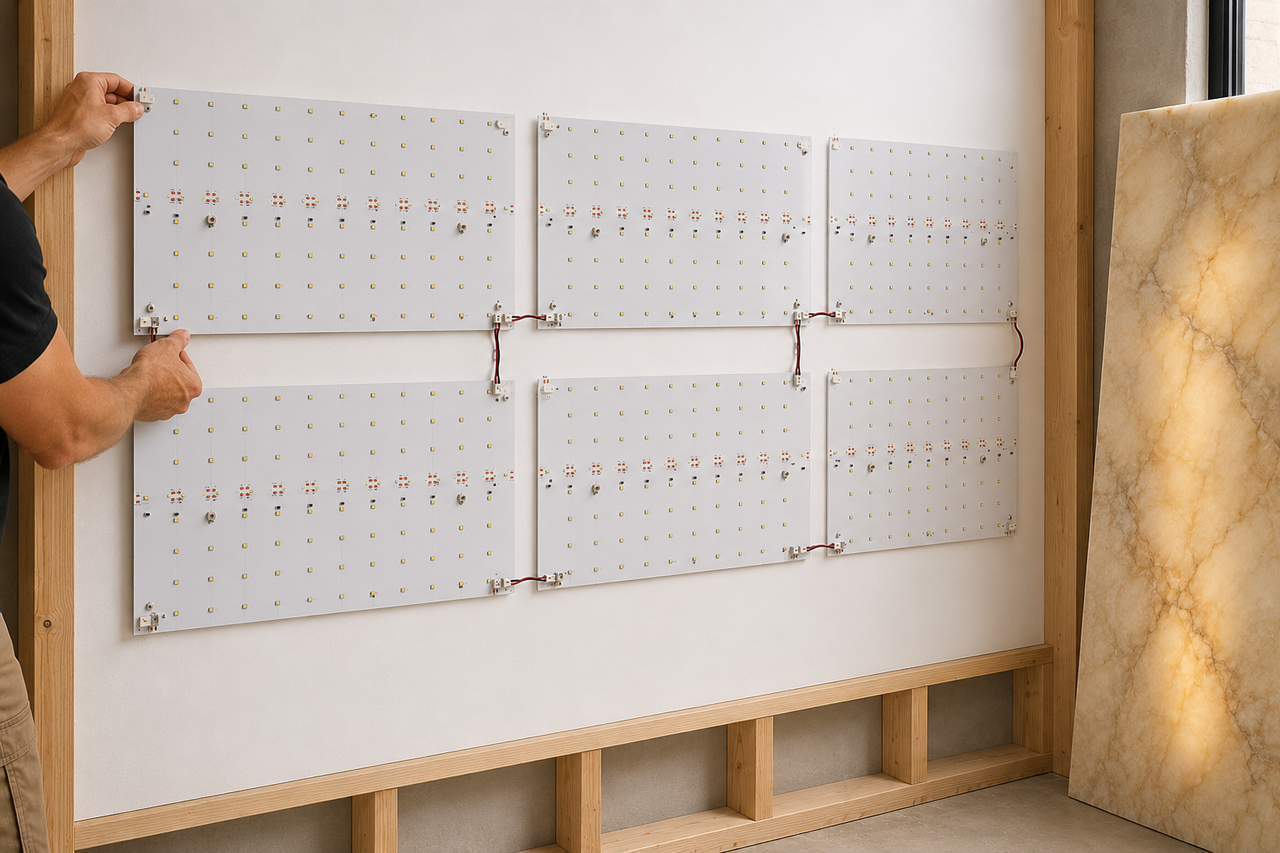
- Frame the cavity. Build a 50mm-deep timber or aluminium frame matching the footprint of the slab. Paint the back wall and inside faces matte white.
- Plan the LED layout. Lay the panels out dry on the back wall first. Confirm the JST chain runs in a single direction toward the driver feed point.
- Surface prep. Wipe the back wall with isopropyl alcohol and let it dry. The 3M adhesive bonds best to clean, dust-free surfaces.
- Mount the sheets. Peel the backing strip and press each sheet firmly into position. Work from one end of the chain to the other.
- Connect the chain. Click each JST jumper into the next sheet. Plan power injection points based on the sheet count rules above.
- Wire the driver. Have a licensed electrician (this is mains AC work) connect the 24V driver to switched mains. Mount the driver in a ventilated, accessible location.
- Test before sealing. Power on and check every panel before fitting the stone. It is much easier to swap a faulty panel now than after the slab is in.
- Fit the stone. Install spacers (clear acrylic blocks recommended), then mechanically fix the slab to the frame. Do not bond the slab directly to the LED panels: leave the air gap.
- Final commissioning. Power on, dim through the full range, and inspect for hotspots in raking light. If you see them, increase cavity depth or add a translucent diffuser film to the back of the slab.
Troubleshooting Common Problems
Visible hotspots through the stone
Almost always caused by insufficient cavity depth. Check that you have at least 40mm of clear air gap. If you cannot deepen the cavity, add a layer of translucent acrylic diffuser (3mm to 5mm) to the back of the slab to soften the LED dot pattern.
One section of the panel is dimmer
Voltage drop. You have run too many sheets off a single feed. Add a second power injection point at the dim end of the chain.
The whole panel is flickering
The driver is incompatible with the dimmer or is undersized. Confirm the driver is rated for the dimming protocol you are using (TRIAC, 0-10V, DALI). If not dimmed, check the driver wattage against actual load.
Yellow patches or colour shift over time
Usually a thermal issue. The LED sheets are rated to 50°C. If the cavity is unventilated and traps heat, drill a few discreet ventilation holes at the top and bottom of the cavity to allow convection airflow.
FAQ
Can you backlight any marble?
No. Only translucent marbles and stones backlight successfully. Calacatta, Statuario, white onyx, honey onyx, and alabaster are reliably translucent. Dense, dark stones like Nero Marquina or absolute black granite block almost all light.
How thick should the marble be for backlighting?
For most decorative wall applications, 12mm to 18mm gives the best balance of brightness and structural strength. Benchtops typically use a 10mm translucent skin laminated to clear glass for support.
What is the gap between the LED sheet and the stone?
Around 50mm is the sweet spot for the Volka 480 x 240mm sheets. Too close and you see hotspots, too far and brightness drops off.
Can I use LED strip instead of an LED sheet?
You can, but for any meaningful area you will likely see strip lines through the stone. Dedicated LED sheets give a flat, uniform field that strip lighting cannot match without a much deeper cavity and a lot more diffuser.
Is the LED sheet waterproof?
The Volka sheet is IP20, designed for indoor dry locations. It is fine behind a sealed stone splashback, but it should not be installed where it could be hit directly by water.
How many panels do I need per square metre?
Roughly nine of the 480 x 240mm sheets per square metre, allowing for small layout gaps and trim cuts.
Can the panels be dimmed?
Yes, when paired with a dimmable 24V constant-voltage driver. TRIAC, 0-10V, and DALI dimming options are all compatible.
Do I need an electrician?
You need a licensed electrician for the mains AC connection to the driver. The 24V low-voltage side (sheet to sheet, sheet to driver output) is plug-and-play with JST connectors and does not require an electrician for the connections themselves.
What colour temperatures are available?
The Volka Marble Backlight LED Sheet is supplied in 3000K warm white as standard, which is the most flattering temperature for natural stone. For custom colour temperatures or RGB / tunable white versions, contact Volka's custom solutions team.
How long do the panels last?
Rated for over 50,000 hours. At 8 hours of use per day, that is over 17 years of life before reaching 70 percent of original output.
Let Volka Do the Maths: Free Done-For-You Design Service
Backlit stone is rarely a stock-and-go product. Most projects benefit from a quick design conversation about cavity depth, driver sizing, and dimming integration before you order panels, and that is exactly what our team is set up to provide. Tell us your slab dimensions and we handle the rest, end to end, at no cost.
What you send us
- Slab dimensions: width x height in millimetres (and slab thickness if known).
- Stone type: onyx, Calacatta marble, alabaster, agate, or similar (a sample photo helps).
- Application: feature wall, vanity, kitchen island, bar front, reception desk, headboard, signage, etc.
- Cavity depth available: if your joinery is already designed (otherwise we recommend a depth).
- Dimming preference: on/off only, wall dimmer, or smart-home / 0-10V / DALI.
What we send back
- Exact panel count and the optimum layout pattern for your slab.
- Correct 24V driver sized to roughly 80 percent of load for thermal headroom and long life.
- Wiring diagram showing power injection points, JST chain direction, and driver placement.
- Complete shopping list with the panels, driver, dimmer, and any JST extension cables you need, all priced.
- Installation notes covering cavity depth, spacers, ventilation, and the steps your electrician needs to know.
The design service is free. You only pay for the parts you order, and there is no obligation to proceed once you have the spec sheet. We work with homeowners doing a single bathroom splashback right through to architects specifying multi-storey backlit stone facades, and the process is the same: send dimensions, receive a tailored solution, install with confidence.
Send Us Your Dimensions (Free Quote) Explore Custom LED Solutions Contact Us
About the Author
This guide was prepared by the technical team at Volka Lighting, an Australian LED lighting specialist supplying flexible strip, profile, and custom LED systems to homeowners, builders, architects, and lighting designers nationwide. We design, supply, and support backlit stone, cove, decking, signage, and architectural LED installations across residential and commercial projects from Sydney and Melbourne to regional Australia. Visit ledstore.volkalighting.com.au to browse our full range.
Recent Posts
-

Backlit Marble & Onyx LED Guide | Volka Lighting Australia
How to Backlight Marble & Onyx: The Complete LED Stone Lighting Guide (Australia) TL;DR: To backligh …15th May 2026 -

Why LED Strips Are Perfect for Cabinet Lighting | Volka
Why LED Strips Are Perfect for Cabinet Lighting TL;DR: LED strips are the ideal cabinet lighting sol …10th Apr 2026 -

SMD vs COB vs DOB LED Strips | Comparison Guide | Volka Lighting
SMD vs COB vs DOB LED Strips: The Complete Australian Comparison Guide TL;DR: Need a flawless, conti …19th Mar 2026